Friday, March 30, 2012

Getting ready for Montreal--Toronto


The accomplice will go to a conference in Toronto mid-month, and I thought this would be a great opportunity for the first big cycling adventure of the year: riding from Montreal to Toronto. If I'm actually going to do it is not 100% certain: should the weather forecast predict high temperatures of less than 5°C and/or significant precipitation I will most probably cancel the trip. But that will be a last minute decision and until then I'll keep planning and dreaming. Here are the bare facts so far:

  • Route: I have it mostly worked out: follow the Route Verte 5 to the Quebec border, then follow the Waterfront Trail on the St. Lawrence and Lake Ontario into Toronto.  Still to do: figure out the best way to get out to York University.
  • Accommodation: Most campgrounds won't be open for the season yet and thus I will travel light and stay in the cheapest motels I can find. In some stretches of the route, for example Prince Edward County and around the Thousand Islands, that might not be that cheap after all but we'll see. 
  • Bike: Clearly Wolfgang, my trusty all-purpose Cross-Check. Were it summer, requiring much fewer clothing items, I might have done it on Gunnar, but for early spring Wolfgang is the better choice. He is in pretty good shape, with readjusted pedals and a new bottom bracket but there are still a few things I need to service, most importantly repacking the rear hub and changing the brake pads.
  • Return to Montreal: By train, hopefully in one of their bike trains.
  • Daily kilometrage: Total distance is about 650km and I plan on doing it in 6 days. The daily average thus is about 110km. I won't book any accommodation in advance and thus take the liberty to do less or more per day.
  • Food: Being a vegan, I'm a little worried about my food options en route. Ideally I'd cook myself but doesn't go well with credit card touring. But since it's only going to be 6 days I should be okay.

Friday, March 23, 2012

Ride report: Going west, to the Canal de Soulanges

One temperature record is following the other here in Montreal, and after my rather foggy Saturday ride, Sunday was forecast to be sunny and warm. Despite not having gotten much sleep, I decided to go for a long ride, getting to the mainland west of the Ile de Montreal for the first time this year. After taking the usual way west, along the Lachine Canal and then following Lakeshore/Bord du Lac to the western tip of the island. Then you cross the Rapides de Sainte-Anne next to the motorway and go across Ile Perrot on the fairly busy and unattractive Grand Boulevard/5e Avenue (a nicer alternative is to go around the island, but that adds a lot of distance). Another bridge next to A20 will take into Dorion where after half a kilometer of very dangerous contra-flow riding on the shoulder of the A20 you turn left onto Avenue Saint-Jean-Baptiste and then merge onto Route 338. Route 338, running mostly parallel to the A20 is not very busy and has a nicely paved shoulder all the way to the hamlet of Pointe-des-Cascades. Pointe-des-Cascades is the end point of the now derelict Canal de Soulange. According to Wikipedia, the canal was built as a replacement for the original Beauharnois Canal but became obsolete with the opening of the St. Lawrence seaway on the other shore of the river.

Canal de Soulange
Large parts of the Canal de Soulanges were still covered with ice

Route 338
Route 338: as straight as it gets
A very nice bike path is following the old canal on its entire length--something I didn't realize before already having ridden on the parallel Route 338 for a couple of kilometers. On this stretch, the nice paved shoulder was replaced by the typical Canadian unpaved shoulder, but as traffic remained light riding was very pleasant. Following the canal, the road is dead straight for many kilometers, interrupted only by a big construction site at the crossing with the future Autoroute de l'Acier.
Construction at the future A30
Building a southern bypass for Montreal
Having now realized that there was a bike path on the other side of the canal, I rode across a bridge and initially was very happy to find a nicely paved, wide path. However, happiness didn't last for more than a couple hundred meters, as in the shade there were still significant amounts of ice and snow on the path. the first few patches I precariously rode over, but it only got worse and I decided to turn around and continue on the 338. (Probably a wise decision, as on the way back I encountered a roadie who had just crashed on one of the icy patches).
Canal de Soulange bike path: here without snow
Not having eaten too much, I slowly started bonking and I decided to stop at the next little village, Coteau du Lac, have some food and then head back home.
Crackers and Pepsi: the lunch of champions
Having de-bonked and with the benefit of a slight tail wind I just glided back, first on the 338 and for the last part to Pointe-des-Cascades on the bike path.

Ceci n'est pas un dirt road. Just a bike path at the end of winter.
The rest of the ride was rather uneventful, but provided the opportunity for taking a bunch of nice snapshots:
Still a lot of ice on the river
Big ice sheets floating down the Rapides-de-Sainte-Anne


Contra-flow bike/ped lane on Bord-du-Lac
A final rest stop
Just before the sun set I arrived home, after 140km.

Wednesday, March 21, 2012

Ride report: going east, through the fog.

I haven't posted ride reports in a long time. One of the main reason is winter-related: in winter I find it too cumbersome to take pictures while going for a ride. Instead of just pulling the camera out of the back pocket of your jersey and snapping a shot while riding, you have to stop, take off your gloves, open the zipper, take the picture, stow away camera, put on gloves. And without pictures ride reports tend to be rather dull. Well, Montreal has been experiencing record temperatures of well over 20 degrees (and that's Celsius, not Fahrenheit!) and therefore I've been riding a lot and I've taken pictures.

Saturday started out somewhat bad: I had woken up at 5:30 but it was all foggy. The fog -- and the low temperatures -- didn't go away but at about 9 I got going anyway. After having ridden around the western half of the Ile de Montréal a couple of times now, this time I wanted to head out east. There is bike infrastructure going along the southern shore of the island all the way to its tip but from experience I knew that huge proportions of it are badly designed, badly maintained, or sometimes both. Therefore I took the easiest possible way: turn right onto Notre-Dame and keep going and going and going. Riding on Notre-Dame was alright, despite it being a major thoroughfare with up to 8 lanes. On a Saturday morning traffic was light and with one exception cars passed me with care.
Foggy Notre-Dame
The fog didn't only accumulate on my clothing but also on my glasses, making them mostly useless.
Near the tip of the island I then switched over to Sherbrooke and a bike path in reasonably good shape.

Once the path moved away from the road, however, it was still too snowy and icy to be usable. Therefore I followed Boulevard Gouin all the way to the point where I had to turn south to cut across the island into downtown. Before that, though, I came across the newly constructed path on the A25 bridge---which unfortunately was still closed.

After a quick stop to pick up a tool at ABC Cycles I then took a gratuitous detour up Mont Royal, now fully in the lovely spring sun. Total distance was about 70 km. Report from Sunday's ride will follow shortly.

Thursday, March 15, 2012

Broken Brooks B17: The Continuation

My Brooks is still broken, but there have been a few noteworthy developments. After posting about my plight on German radreise-forum.de and on this blog, I have received some useful feedback. A commenter here pointed out that Brooks has an "official" repair person in Philadelphia and that I should contact the US Brooks distributor, Highway Two, to get the repair shop's contact info. Unfortunately, they didn't reply to my email. I then contacted Brooks directly and within a couple of minutes they replied:
There is a man called Simon Firth who runs Hanford Cycles in Philadelphia who was trained here at the factory in Smethwick so he should be more than capable of repairing it for you. His email addresses are: hanfordcycles@gmail.com or brooksrepair1@gmail.com.
The second email address is no longer in use but after sending a message to Hanford Cycles I quickly got a response from Simon Firth. Repairing my B17 would cost 36 dollars for parts, 35 for labor and about 10 for shipping, totaling at 81 dollars. Plus the cost for me to ship the broken saddle to Philly and the ever-looming Canadian custom fees and taxes. Now I by no means think that these charges are too high (an online friend from Germany told me that he was quoted a total of 60 Euros for a repair directly at Brooks); however, I had bought the B17 for 90-something dollars shipped. So I don't think I'll have the saddle professionally fixed.

At the same time, I really don't want to throw out a piece that has served me so well and is in principle repairable. As a result I will attempt a repair myself. As mentioned before, Brooks sells all the necessary spare parts (i.e. the frame plus rivets) and their shipping charges to Canada are reasonable. Another online friend directed me at this very detailed how-to and the process seems to be doable. Some more advice and pictures can be found here. It's all in German but the pictures should be helpful. I'll order the spare parts soon and will report on the repair.

In the meantime, I have replaced the Brooks with the Velo Orange Model 1 and after the first 120km ride I'm pretty happy with it. But more on that in another post.

Friday, March 9, 2012

Cheap or expensive -- Which bottom bracket to choose?

If you've read my previous post on the toll of winter, you know that my bottom bracket is grindy. I haven't kept exact records of how many kilometers I have ridden with it, but I'm pretty sure that it's only about two years old and definitely has less than 10 000 km on it. That's pretty disappointing for a cartridge bottom bracket. I've looked at different options for a replacement and it was hard to decide between them:
  • get another cheap Shimano cartridge BB and hope that this time it will last longer?
  • get the really nice SKF bottom bracket that has a 100 000 km/10 year warranty?
  • move away from square taper BBs and try a external bottom bracket system?
The last option I did not really consider. My cranks are still in good shape, as are all three chainrings. In addition, people's experiences with external bottom bracket systems appear to be mixed. In theory they seem like a great idea (easier to install, larger bearings) but in practice it hasn't quite worked out like that. Therefore, it came down to deciding between cheap and expensive. Interestingly, in the world of square taper bottom brackets there isn't really any middle ground: square taper system have become less and less common and SKF is, as far as I know, the only high-level option.

I was really tempted by the SKF bottom brackets, currently only distributed by Compass Bicycles. A 100 000 km warranty (given my annual mileage it would probably be the 10 years that come first) is pretty impressive, and as exchanging bottom brackets is one of the more time consuming maintenance items it can make a lot of sense -- install and forget! The price for those carefree 100 megameters is fairly steep, though: 129 USD plus shipping (and probably taxes and customs for us Canadians). Compare that with the cheap Shimano option: at the LBS, a UN-55 bottom bracket costs 30 dollars, meaning I can buy four to five Shimano BBs for the price of one SKF (if you live in the US you can get them for less than $17 shipped on Amazon. Simplistic rational choice economics would probably tell us to go for SKF: if my new Shimano BBs are going fail like the last one, at only 10 000 km, five of them will only last for 50 000 km -- versus the at least 100 000 km of the SKF. But what if the SKF breaks down before that and I'll have to pay for the shipping back to the US? And are kilometers the right metric if I'm riding less then 10 000 km per year anyway? What if my bike gets stolen (not that unlikely in Montreal)? What if the new Shimano bottom bracket will last much longer than the previous one, as they do for a lot of people? On the other had, isn't buying cheap but crappy things horribly unsustainable and making me a bad person?

Those are all legitimate questions and to some of them there are no easy answers. In the end, I bought another Shimano BB UN-55: The LBS had them in stock, a 30 dollar hole hurts much less in my wallet than a 150 dollar hole, and I'll just have to hope that this time I'm more lucky.

Which trade-offs do you make in the realm of bottom brackets? Have you moved beyond square taper and Octalink? Or are you a retrogrouch with good old cup-and-cone bearings?

Tuesday, March 6, 2012

Almost like a Brooks? First Impression of the Velo Orange Leather Saddles Model 1 and Model 3

Update July 2012: Please also read my recent review of the Model 1.
 
After my recent Brooks mishap I decided to try something new. Velo Orange, one of the brands that sells leather saddles made by Taiwanese company Gyes, had a sale on two of their models, their "Model 3" being a copy of the Brooks B17 touring saddle, and "Model 1" a copy of the Brook Team Professional, which is somewhere in between a touring and a road racing saddle. It would be hard not to compare the VO offerings with their Brooks counterparts, and since I have a good deal of experience with Brooks products, that's what I'll do.
Velo Orange Model 1 (left) and Model 3 (right)

First, let's talk about cost. Shipping to Canada was 17 Dollars and unfortunately I also got hit with sales tax and processing fees (it's pretty unpredictable when you have to pay sales tax and when you don't). So the overall cost for both saddles was 60 + 65 + 17 + 25 USD, coming out to 83.50 per saddle. On Amazon.com, a real B17 currently sells for 107 USD and a Team Pro starts at 135 USD, both including shipping to the US. With some research it might be possible to get them for slightly less (e.g. buying from a European webshop), but the Velo Orange saddles are definitely still going to be cheaper, even at their regular price of 85 and 90 dollars.
"Aged" leather of the Model 3. Not the binding in the middle of the saddle
On first view, the saddles look pretty similar to their Brooks inspiration, but there are a number of differences. For the Model 3, the most obvious one is the leather itself: whereas the regular Brooks features smooth leather, the VO saddle's surface resembles more that of the Brooks "Aged" models. The "aged" leather is supposed to break in more quickly--but consequently will also stretch and wear more rapidly. VO doesn't say anything in particular about the Model 3's leather and the leather still feels pretty stiff and hard. The Model 1, on the other hand, has a smooth surface that looks a little more dull than a real Brooks. But I'm suspecting that might change after the application of Proofide and some polishing/riding.

Model 1. A little dull.
From below, both saddles look quite different from a Brooks: instead of leather you see some kind of textile layered over the leather's surface. I guess this is for protecting the saddles from road spray, something that I don't have to care about because of my fenders. Another obvious difference between the Model 3 and a B17 is that the former is bound with two holes in the middle of the saddle. This prevents the sides of the saddle from flaring and it will also make the saddle a bit harder (depending on how tightly you bind it). Compared to a standard B17, Model 3's rivets are bigger. I'm not sure what they're made out of but it's not the copper of the more expensive Brooks saddles. Finally, in contrast to the Team Pro, Model 1 has bag loops, a feature that is pretty important to me and that made me buy a Swallow instead of the Team Pro for my road bike. 

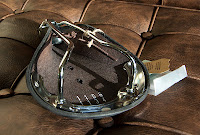
Here you can see the textile underlayer
Underside of the Model 1
One less obvious difference are the saddle rails. I've complained about the sub-standard strength of Brooks rails (somewhere in the 6.6 to 6.7mm range) and fortunately the VO saddles feature wider rails. My calipers are out of battery at the moment, but it looks like the rails are at least 7mm wide. This will hopefully prevent the rails from breaking--but might also make the ride slightly harsher. Another frequent criticism of Brooks saddles is their limited fore-aft adjustability. Because Brooks saddles were developed in the age of slacker seat tube angles and haven't changed since then, some people have problems getting the saddle as far back as they would like to. I haven't measured the rails yet, but VO says theirs offer 10mm more space. (If you want even more range you should have a look at Selle AnAtomica saddles).

Model 1 next to a Brooks Swallow
Another less obvious difference is weight: On my kitchen scale, the Model 1 came in at 541g (claimed weight 520g) and the Model 5 was 646g (vs 665g claimed). This makes a tie between Model 1 and a Team Pro (claimed weight 520g), but quite a difference between Model 3 and the claimed 520g of a B17.

I think this is all I can say for now, but updates will follow once the saddles are in use.
Update July 2012: Extensive review of the Model 1

Sunday, March 4, 2012

Winter's toll. And a winter bike?

Winter is far from over here in Montreal. But because of a snapped gear cable I decided to do a spring tune-up on Wolfgang, my all-purpose, all-year bike. A lot of people have "winter beaters," but to me that never made too much sense: I really like my bike and don't see the point of riding an inferior quality bike at a time that places the highest demands on bike and rider. Especially, I wouldn't want to give up on my hub generator and LED lighting at the darkest time of the year. So far, this has worked well for me and the wear and tear of components didn't seem to be particularly bad. But somehow this winter seems to have been worse than previous, if not in weather but in damage to parts. My rear rim was destroyed a couple of weeks ago, after less than 10 000 km.
Busted rim
And during my tune-up today I discovered a whole bunch of other issues:
  • my bottom bracket feels noticeably grindy
  • the front brakes, Avid Single Digit 7, didn't turn that well around the brake bosses
  • the Tiagra front derailleur is sticky and doesn't want to go to the smallest chainring any more
  • all the cables and housing are in miserable condition and have to be replaced
  • a lot of the bolts, despite being made of stainless steel, show a lot of surface corrosion
  • one of the Shimano M424 pedals feels crunchy in the bearings
I'm not quite sure why this winter has been worse than others. I might have ridden more (last year I didn't ride between mid-January and the end of March because of a broken wrist), Montreal winters might be somewhat harder than those in Ithaca, and in some cases it is probably just accumulative damage.

This can't be good for your bike, can it?
It seems tempting to add a dedicated winter bike to the stable, and if I had the resources (and permission from the accomplice) I would probably get a bike with the following features:
  • dynohub and lower quality LED lighting (e.g. the B&M Lyt): As stated above, I wouldn't want to give up on my dynohub-powered lighting system. However, for riding in the city I don't need a B&M Cyo or Philips SafeRide light. It's more about being seen than about seeing.
  • frame with upright position: A frame that allows me to ride in a more upright position would help in snowy and icy conditions.
  • SPD-compatible pedals: I also wouldn't want to give up on SPD pedals and I'm happy with my Lake winter cycling boots.
  • plastic saddle: Whereas for long rides a leather saddle is an absolute requirement, for commuting a plastic saddle will do and also take care of the issue of having to cover your saddle---this season I managed to lose 3(!) saddle covers.
  • drop bars: A lot of people prefer straight, Albatross, or North road bars for a winter bike; this makes sense from a balance and control perspective; however, my wrists are not built for any kind of non-drop bar, even on reasonably short rides.
  • good and wide studded tires: Wheel size is not particularly important for me but good studded tires are a must. And some wideness helps with floating over snow.
  • disc brakes (at least in the front): Rim brakes with drop bar levers can be pretty problematic in wet conditions, and most of the time winter means wet roads. Therefore I want disc brakes, probably mechanical ones like the Avid BB7 because of the drop bars. In addition, rim wear is not an issue with disc brakes.
  • Not a good studded tire
  • 2-speed Sturmey Archer Duomatic kickback hub with low gearing: I'm not a single-speed or fixed gear person because my knees don't like me mashing up hills (and hills I like!); at the same time, derailleur systems don't particularly like road salt and constant wetness. A 2-speed Sturmey Archer kickback hub thus would be perfect: no cables, allows to use a 1/8" chain, and has more than one gear. I've never ridden a Duomatic hub so maybe it's not as good as I think.
I don't really see me building up this bike any time soon. But one may dream while wainting for spring...